How to Print PETG Without Stringing: Tested Slicer Settings

Disclosure: This article contains affiliate links. If you purchase through our links, we may earn a commission at no extra cost to you. We only recommend products we have personally tested.
Why PETG Strings So Much (And Why Most Advice Doesn’t Fix It)
PETG is hygroscopic, viscous, and stubbornly sticky. Unlike PLA, which snaps cleanly when the nozzle retracts, PETG stretches into thin filament threads between travel moves. The material’s melt viscosity at typical print temps (230–250°C) is roughly 30–40% higher than PLA at its sweet spot, which means retraction alone can’t always break the strand before the toolhead moves on.
Here’s what frustrates most people: you search for PETG settings, and every result tells you the same thing — increase retraction distance, lower temperature, enable combing. You tweak one setting, print a stringing tower, see marginal improvement, and spend the next three hours chasing diminishing returns. The slicer settings feel overwhelming because you’re adjusting five variables at once with no clear order of operations.
I’ve printed hundreds of PETG parts on my Bambu Lab P2S, and the single biggest lesson I’ve learned is that stringing in PETG is rarely caused by one wrong setting. It’s a system problem. Temperature, retraction speed, retraction distance, travel speed, and part cooling all interact. Change your temp by 5°C and your optimal retraction distance shifts too.
Most generic guides also ignore a critical factor: filament moisture. PETG absorbs atmospheric water fast — even a spool left out for 48 hours in moderate humidity (~55% RH) will string noticeably worse than a freshly dried one. If your filament isn’t dry, no amount of retraction tuning will save you.
The fix isn’t one magic number. It’s a specific sequence of adjustments, starting with the variable that has the biggest impact and working down.
What You’ll Need Before You Start
Before touching slicer settings, make sure your hardware and filament are actually ready. Skipping this step is the #1 reason people chase stringing fixes that never work.
Hardware checklist:
- A printer with direct drive extruder — Bowden setups can print PETG, but retraction tuning is a nightmare. My Bambu P2S handles it natively; most CoreXY printers from Bambu, Prusa, and Creality’s K1 series do too.
- Hardened steel or brass nozzle, 0.4mm — Stock brass works fine for standard PETG. If you’re running carbon-fiber-filled PETG, swap to a hardened steel nozzle or you’ll wear through brass in under 10 hours.
- Clean build plate — PETG bonds aggressively to PEI sheets. Wipe yours with 90%+ IPA before every print.
Filament checklist:
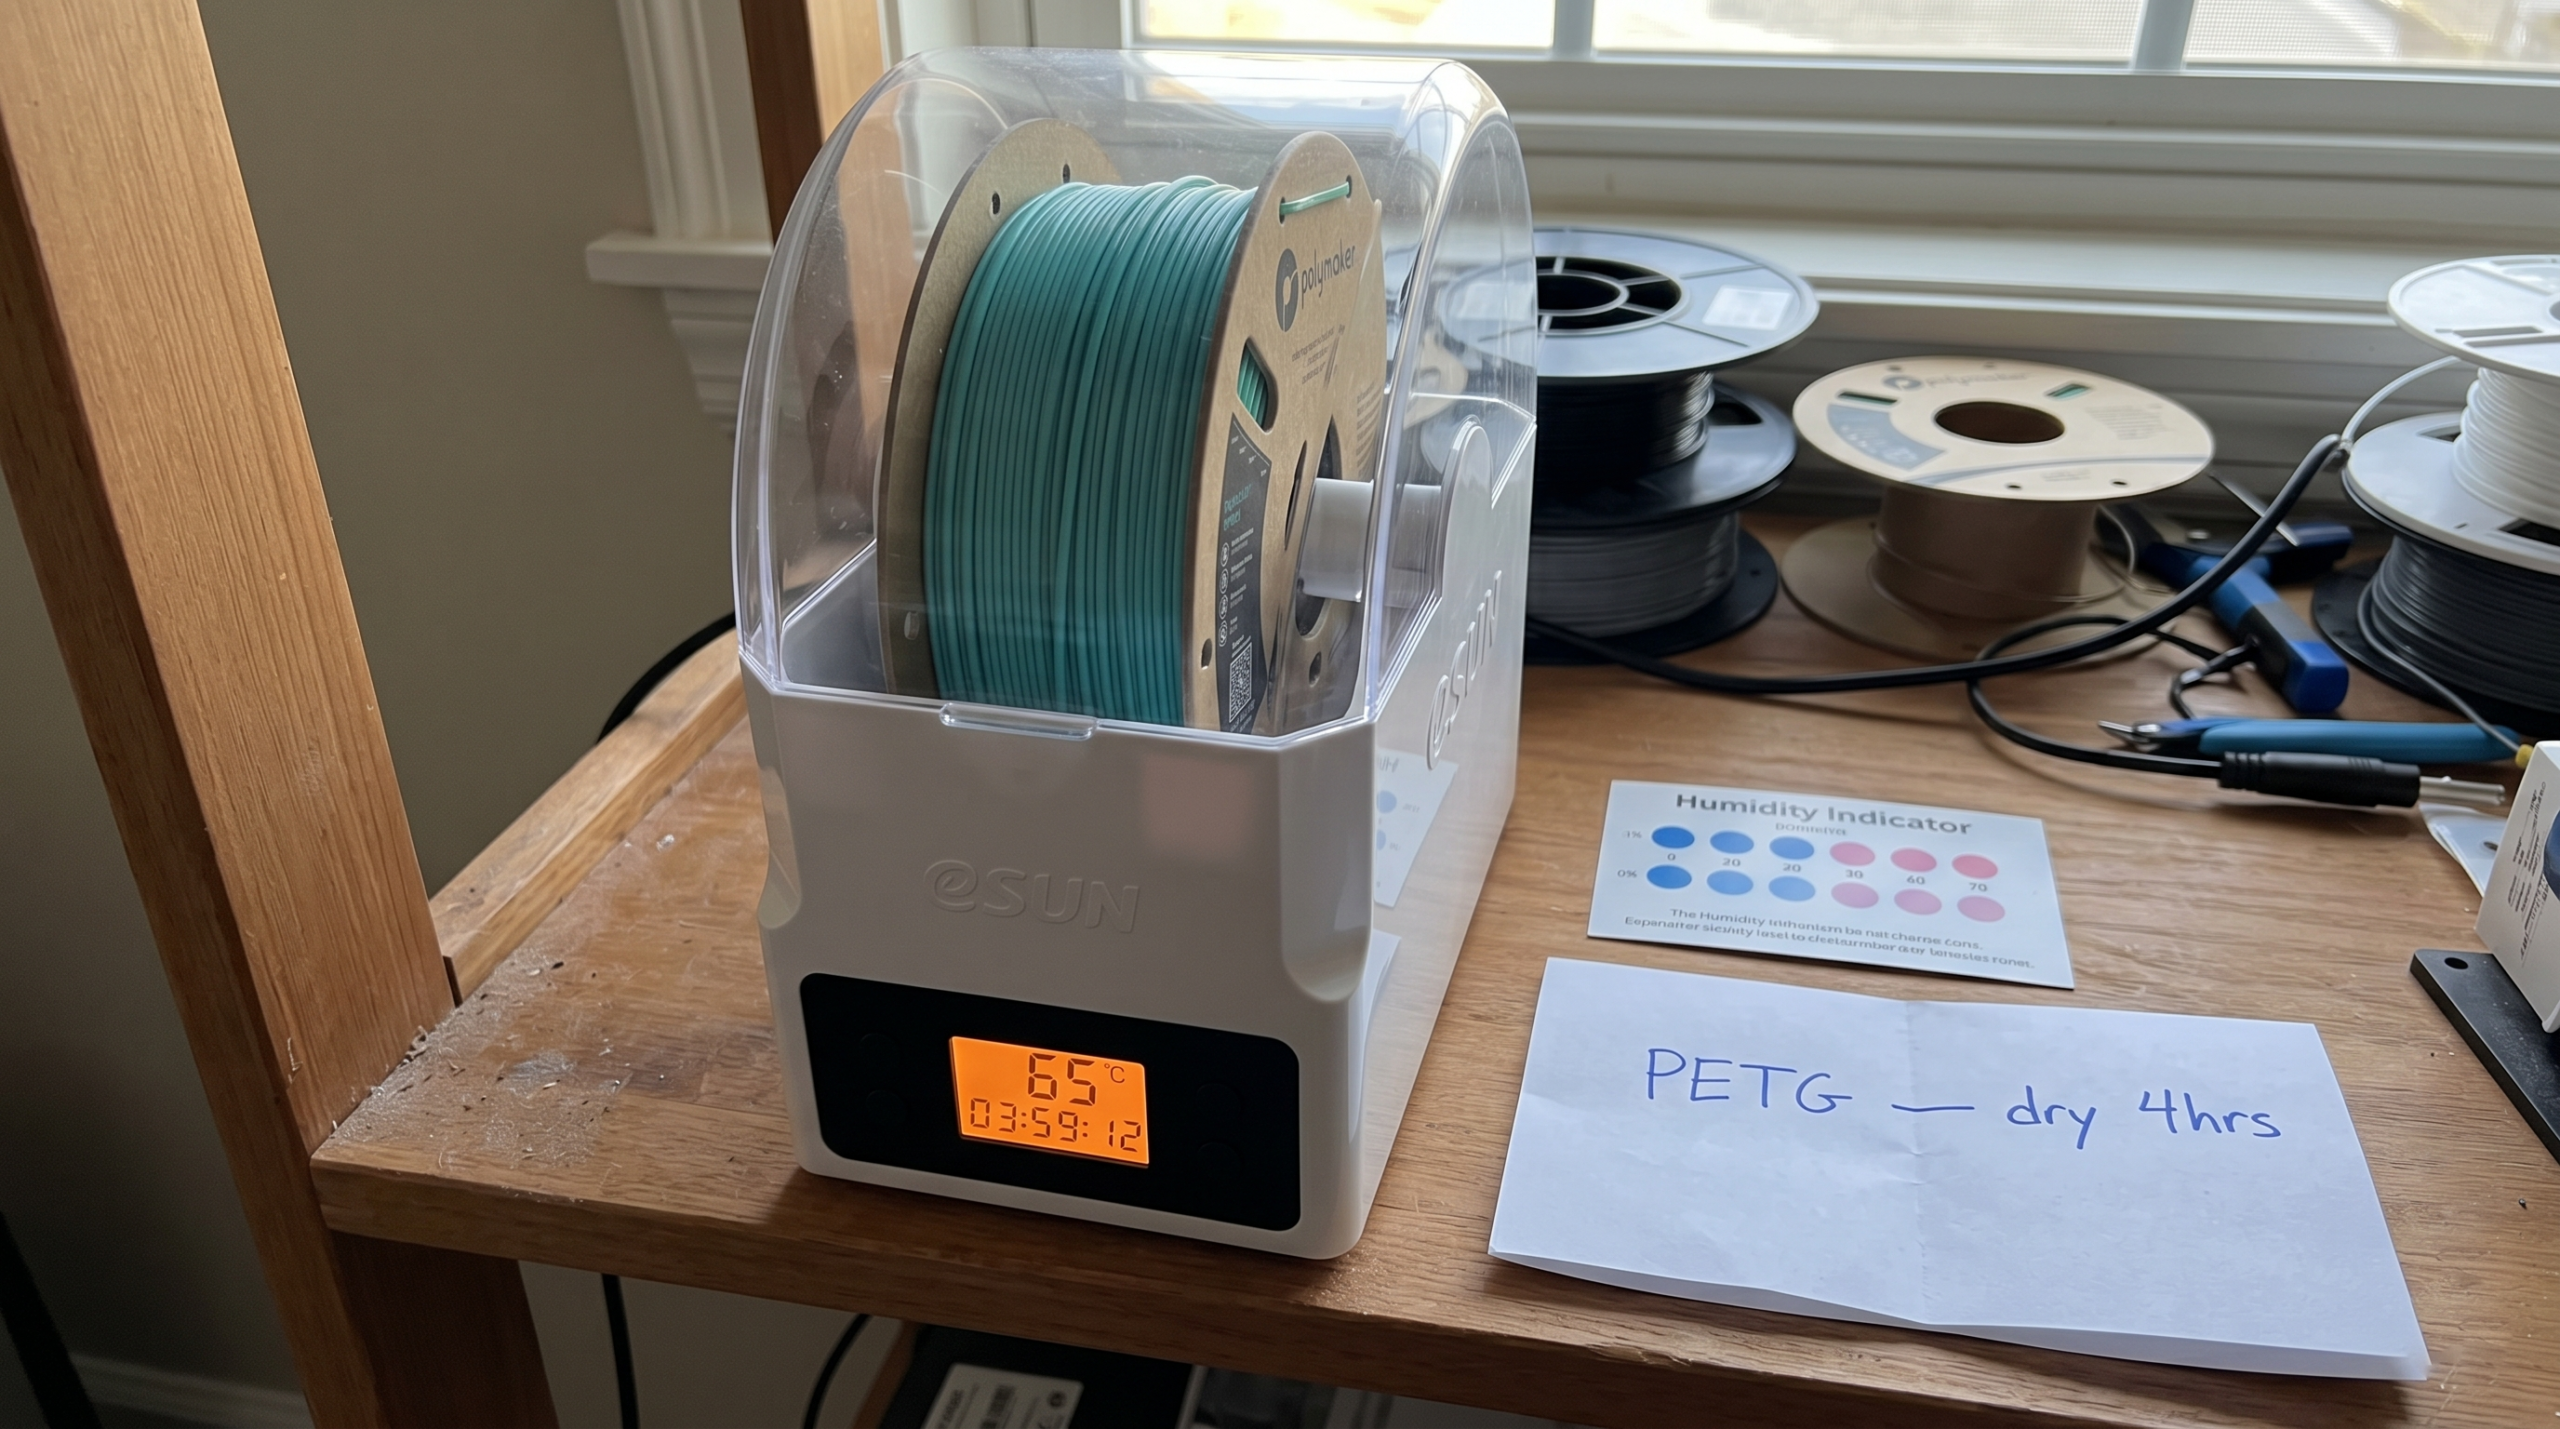
- Dry PETG — This matters more than any slicer setting. PETG absorbs moisture fast, and wet filament doesn’t just string — it jams and clogs your hotend. If your spool has been sitting open for more than 48 hours, dry it at 65°C for 4–6 hours. I keep an eSun eDryer Box running 24/7 for exactly this reason.
- Known-good brand — Polymaker PolyLite PETG and Bambu Lab PETG have given me the most consistent results. Cheap no-name PETG varies wildly between batches.
See the $599 printer that nails PETG →
Step 1: PETG Temperature Settings — Dial In Your Nozzle Temperature
Temperature controls how runny your PETG is — and runny PETG strings. Period. If you only change one setting to print PETG without stringing, make it this one.
Most PETG filament rolls list a range like 220–260°C. That’s absurdly wide. Printing at 250°C when your filament runs clean at 230°C is the difference between a part you’re proud of and a cobwebbed mess.
How to Find Your Sweet Spot
- Start at the low end of the manufacturer’s range. If the roll says 230–250°C, begin at 230°C.
- Print a temperature tower. Orca Slicer and PrusaSlicer both have built-in temp tower scripts.
- Evaluate each section. You’re looking for the lowest temperature where layers still bond cleanly.
In my testing on the Bambu P2S, most Polymaker PolyLite PETG prints best between 230–235°C. Bambu’s own PETG runs a touch hotter at 240°C.
Brand-by-brand starting points:
| Filament | Target Temp | Retraction Start |
|---|---|---|
| Polymaker PolyLite PETG | 230–235°C | 0.8mm |
| Bambu Lab PETG | 238–242°C | 0.8mm |
| Hatchbox PETG | 235–240°C | 1.0mm |
| Generic / unknown brand | Start at 245°C, test down | 1.0mm |
The Honest Caveat
Lowering temperature reduces stringing but also reduces interlayer strength. For decorative prints, push the temp as low as you can. For functional parts, you’ll need to accept slightly more stringing and clean it up with a heat gun afterward.
Quick rule of thumb: Drop 5°C from whatever you’re using. If stringing improves without delamination, drop another 5°C. Stop when layers start separating, then bump back up 5°C. That’s your number.
Step 2: PETG Retraction Settings — Distance, Speed, and Z-Hop
Retraction pulls filament backward out of the melt zone right before the nozzle relocates. Get it wrong, and PETG oozes a thin thread across every gap.
Retraction Distance
For direct-drive printers like the Bambu P2S or Prusa MK4S, start at 0.8 mm. PETG doesn’t need aggressive retraction — anything above 2 mm on a direct drive causes jams because you’re pulling semi-molten plastic into the cold zone of the heatbreak. I learned this the hard way after three consecutive clogs on a 3 mm setting.
Retraction Speed
Set to 30–40 mm/s. At 60 mm/s I noticed my P2S was grinding filament on longer prints, creating dust in the extruder gears that worsened stringing over time. 35 mm/s has been my sweet spot for months.
Z-Hop: Use It Carefully
My recommendation: set Z-hop to 0.2 mm or disable it entirely. Z-hop gives PETG more airtime to ooze — every extra 0.1 mm of lift is more opportunity for a string to form.
| Setting | Direct Drive | Bowden |
|---|---|---|
| Retraction Distance | 0.6–1.0 mm | 4–6 mm |
| Retraction Speed | 30–40 mm/s | 35–50 mm/s |
| Z-Hop | 0–0.2 mm | 0–0.3 mm |
Step 3: Optimize Print Speed and Travel Speed
The mistake I see most often: people run PETG at the same 150–250 mm/s speeds they use for PLA. PETG is more viscous when molten. Push travel moves too slow and the nozzle drags through ooze, leaving whisker-thin strings across every gap.
- Print speed (perimeters): 80–120 mm/s.
- Print speed (infill): 120–150 mm/s.
- Travel speed: 200–250 mm/s. Quick travel moves give molten PETG less time to ooze. If your travel speed is at 120 mm/s, that’s likely a major contributor to your stringing.
- Acceleration: 5,000–8,000 mm/s² for travel moves.
In Orca Slicer, these live under Speed → Travel Speed and Printing Speed. Adjust travel first.
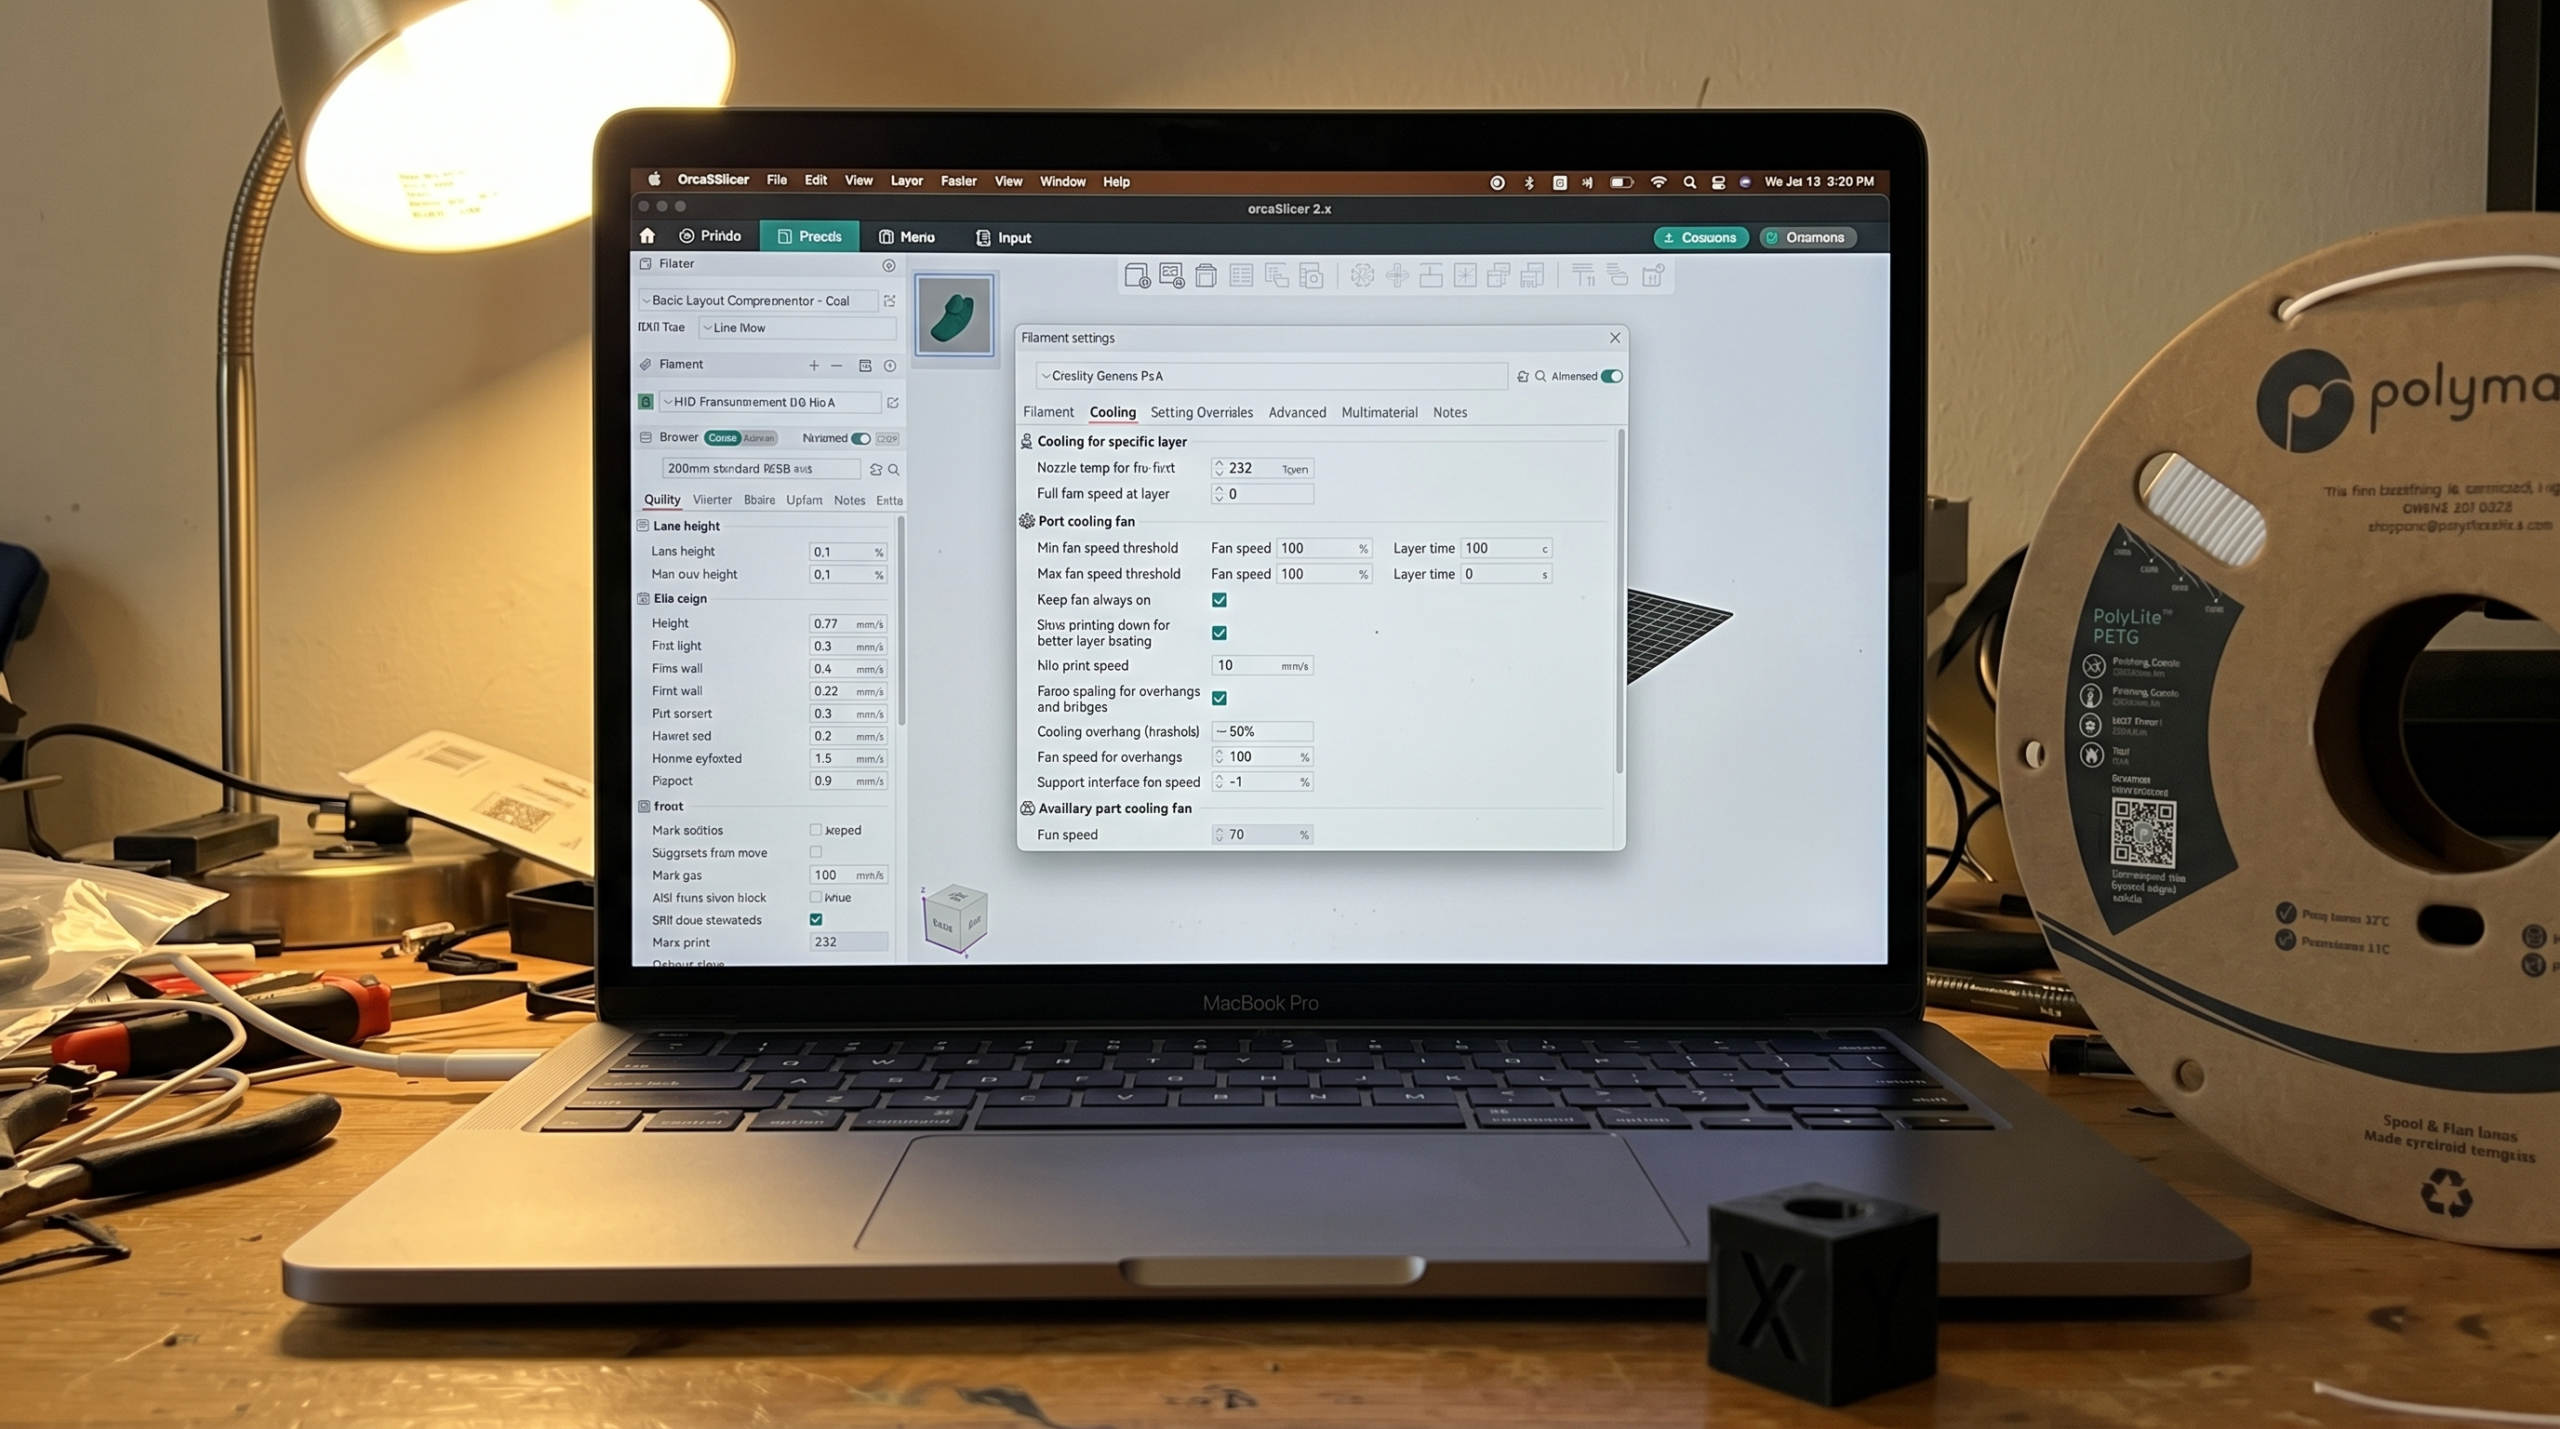
Step 4: Get Your Cooling Fan Settings Right
On my Bambu P2S, I run the part cooling fan between 30–50% for PETG. Never 100%.
- First 3 layers: Fan off (0%).
- Layers 4+: Ramp to 30%.
- Bridging: Bump to 50–60% during active bridges only.
- Overhangs under 45°: Stay at 30%.
The thing nobody warns you about: PETG’s glass transition is 80°C — not 60°C like PLA. Your cooling fan can skin the surface while the core stays molten. That’s not a fan problem — that’s physics, and it’s exactly why this material strings when people expect it not to.
In OrcaSlicer, set these under Filament Settings → Cooling.
Step 5: Pressure Advance and Wipe Settings (The Secret Weapons)
Pressure Advance
Without PA, molten PETG keeps oozing after the extruder motor stops — because the elastic energy stored in the melt zone keeps pushing material out for another 15–30ms. That’s your string.
On my Bambu P2S, OrcaSlicer handles this automatically. For Klipper, start with 0.04–0.06 for direct drive. Bowden users typically need 0.4–0.8. I keep separate profiles for Polymaker PolyLite PETG and Bambu PETG because their melt viscosities aren’t identical.
Wipe Settings
Enable “Wipe while retracting” in OrcaSlicer and set wipe distance to 2–3mm. This drags excess material back onto the print instead of stringing it through open air. Keep it under 5mm to avoid surface artifacts on thin walls.
My Complete PETG Slicer Profile — Copy These Settings
Here’s exactly what I run. Not a “try these ranges” — this is the profile loaded on my P2S right now:
| Setting | Value |
|---|---|
| Nozzle Temp | 230°C (first layer 235°C) |
| Bed Temp | 80°C (textured PEI plate) |
| Retraction Distance | 0.8 mm |
| Retraction Speed | 30 mm/s |
| Z Hop | Off |
| Print Speed | 150 mm/s (walls 80 mm/s) |
| Part Cooling Fan | 35% after layer 3 |
| Pressure Advance | 0.04 |
| Wipe Distance | 2 mm |
| Max Volumetric Speed | 15 mm³/s |
One honest caveat: these settings are tuned for Polymaker PolyLite PETG. Cheaper filaments with inconsistent diameter may need 5–10°C bumps and slower retraction.
See the $599 printer that nails PETG
Troubleshooting: Still Getting Strings? Check These 5 Things
Before you throw the spool across the room, run through this diagnosis table:
| Symptom | Most Likely Cause |
|---|---|
| Strings everywhere despite tuning | Wet filament — dry it first |
| Strings only on long travel moves | Travel speed too low (<150mm/s) |
| Random ooze mid-print | Partial clog — do a cold pull |
| Whiskers from corners only | Pressure advance too low |
| Strings came back after first good print | Moisture absorbed overnight |
1. Your Filament Is Wet
This is the number-one hidden cause. Listen for tiny popping or crackling sounds during extrusion. That’s steam. Dry your filament at 65°C for 4–6 hours in an eSun eDryer Box before blaming your slicer settings.
2. Your Nozzle Has a Partial Clog
A partial clog creates inconsistent pressure inside the hotend, which means the nozzle oozes between travel moves even with good retraction settings. Do a cold pull with cleaning filament. On the P2S, I do this every 3–4 spool changes as preventive maintenance.
3. Your PTFE Tube Has a Gap
If there’s even a 0.5mm gap between the PTFE tube and the heatbreak, molten filament pools there and creates persistent ooze. This is especially common after swapping to a hardened steel nozzle. Seat the tube firmly and confirm it’s flush.
4. Z-Hop Is Too High
Anything above 0.4mm gives molten PETG more airtime to drool. Keep it at 0.2mm.
5. Print Temperature Is Still Too High
Even 5°C makes a difference. If you’re at 240°C and still seeing strings, drop to 235°C. Polymaker PolyLite PETG prints cleaner at 230–235°C than its label suggests.
Run through these in order. I’ve diagnosed hundreds of community print failures and moisture or a partial clog accounts for most of them. If you’ve hit all five and it’s still stringing — your filament brand is the problem, not your settings.
FAQ: PETG Stringing Questions Answered
Is some stringing normal with PETG?
Yes. A few wisps that brush off with your finger is normal — PETG is not PLA. If you’re getting cobwebs, that’s a settings problem. If you’re getting faint surface haze on clean travel moves, that’s just PETG.
Does PETG string more than PLA?
Significantly more. PETG’s melt viscosity is lower than PLA at printing temps, which means it oozes more freely. The trade-off is worth it — better layer adhesion, UV resistance, and impact strength that PLA can’t match.
Why do my prints look bad compared to what I see online?
Most glamour shots are post-processed. A 30-second pass with a heat gun at 200°C removes micro-stringing completely. Don’t compare your raw output to someone’s finished, dehumidified, post-processed result.
Can I just increase retraction to fix stringing?
Up to a point. On a direct-drive extruder like the Bambu P2S, I keep retraction between 0.6–1.0mm. Going above 2mm risks heat creep and jams. Retraction speed matters just as much — 30–40mm/s is my starting point.
My first layer won’t stick with PETG — is the bed temp wrong?
Probably. PETG likes a hotter bed than PLA — 75–85°C on textured PEI. Also back off your Z-offset slightly; PETG doesn’t like being squished as aggressively as PLA.
Will an enclosed printer reduce PETG stringing?
An enclosure helps with warping and layer adhesion but won’t directly fix stringing. Focus on retraction and travel speed first.
See the $599 printer that nails PETG
Recommended Gear
What We Actually Use
Tested in our own shop. No sponsored placements — just what works.
Polymaker PolyLite PETG →eSun eDryer Box →Hardened Steel Nozzle →
Affiliate links — we may earn a commission at no extra cost to you.
Photo by Jakub Żerdzicki on Unsplash